As companies increasingly embrace data lakes and lakehouses, the challenge of efficiently migrating data from traditional relational databases, such as PostgreSQL or MySQL, becomes crucial.
Traditional methods, like monthly full-database snapshots, are not only inefficient and non-scalable but also necessitate reprocessing the entire dataset for any subsequent modifications.
What is Change Data Capture and why should I care?
An effective alternative can be Change Data Capture (CDC):
- CDC uses database transaction log information that contain all Insert, Update and Delete operations performed on the database.
- This CDC-Feed can be extracted and moved to a data lake such as AWS S3.
- To get an updated status of the database, the CDC-Feed needs to be processed an applied within the data lake.
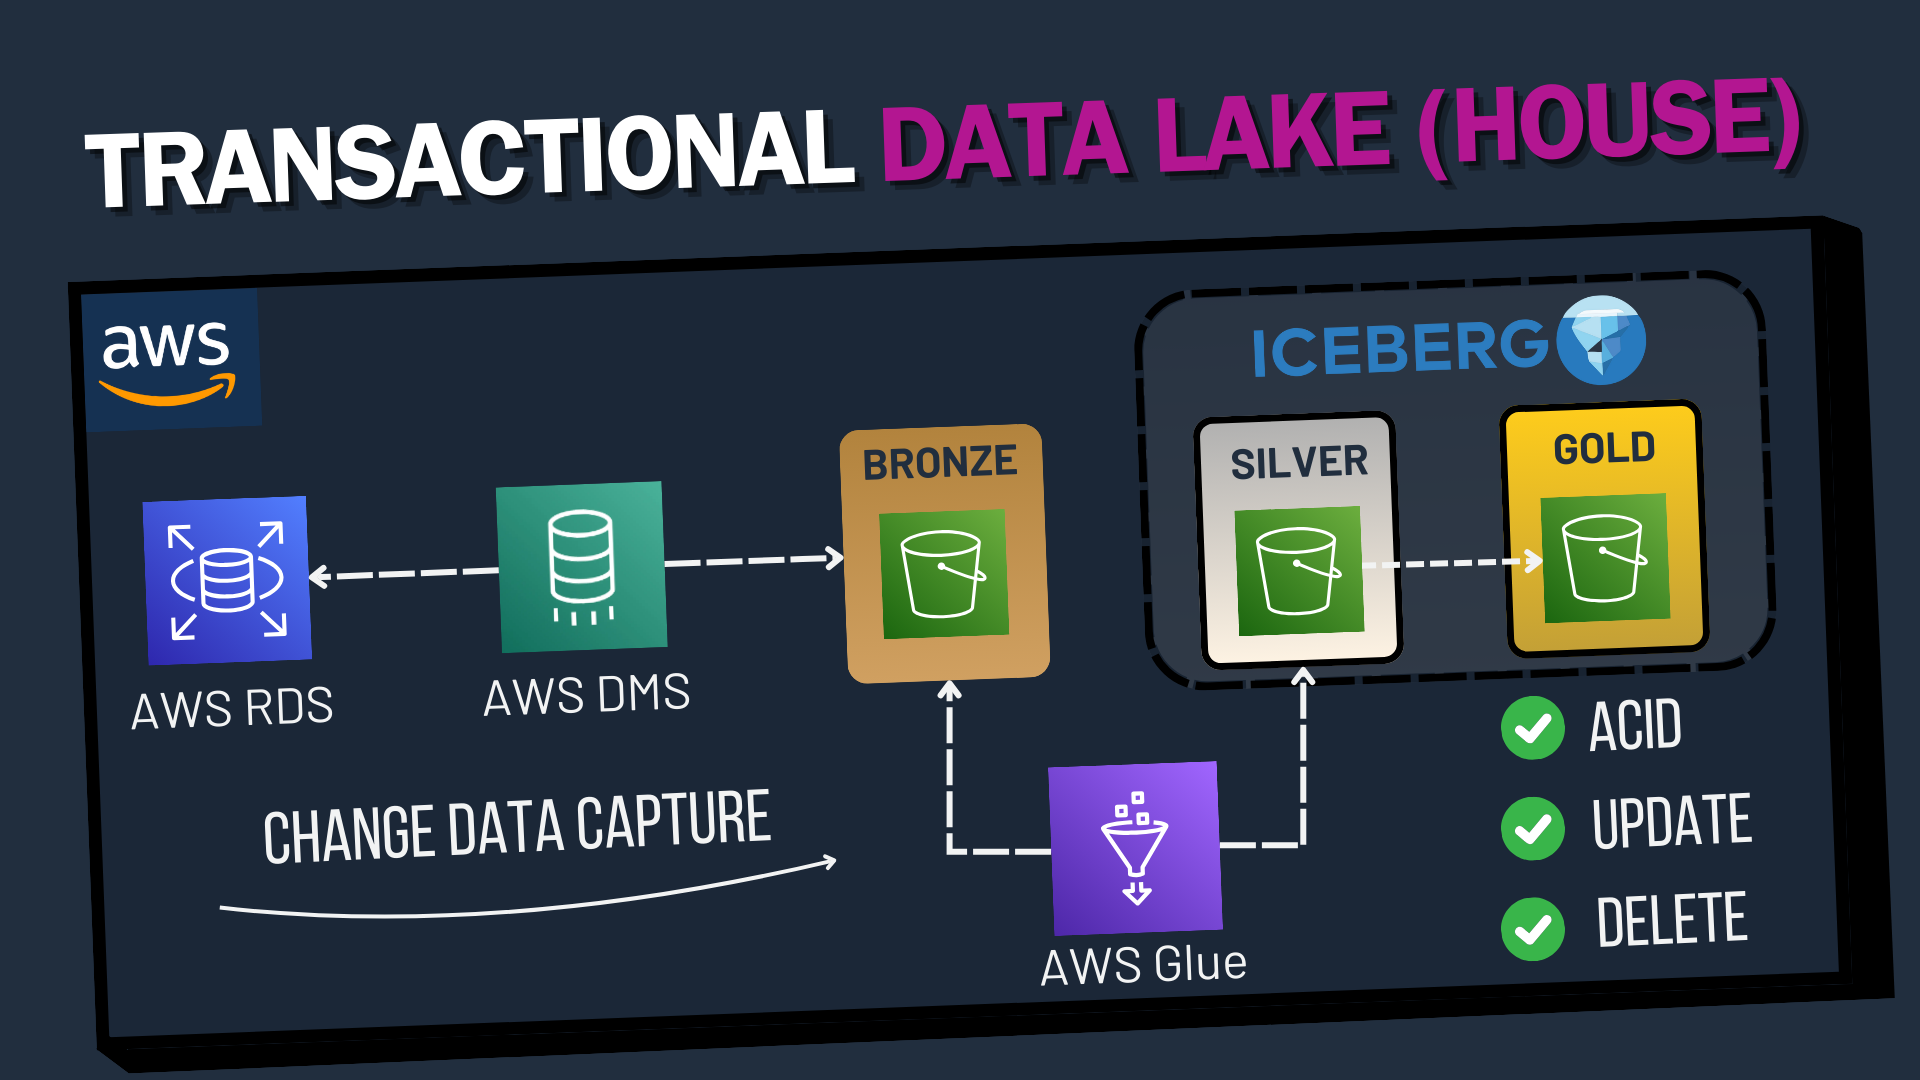
With the rise of open table formats such as Apache Iceberg, Delta Lake, or Hudi, our data lake gains features like ACID transactions, update and delete capabilities at the row level, and time-travel functionalities. This opens up the possibility to apply the CDC feed effectively.
To leverage all these features effectively, an established approach involves a 3-layer architecture: In this scenario, the first layer contains raw CDC data, the second layer holds cleaned data where the CDC merge logic is applied, and the third layer consists of aggregated and joined data, ready for consumption by BI applications. Layers 2 and 3 would use Apache Iceberg in our use case to provide transactional capabilities.
Noticing a lack of comprehensive resources on implementing this in AWS, I was motivated to create this blog post to offer a step-by-step guide.
By the end, we will have a serverless, automatically updating end-to-end pipeline that mirrors changes from the root database to our data lake in near real-time.
Solution Architecture
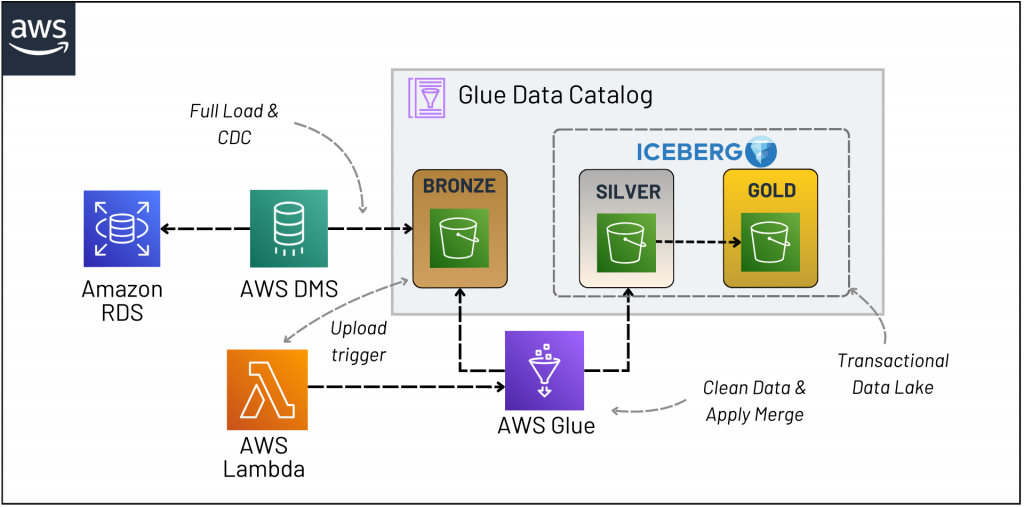
The diagram depicts the end-to-end solution architecture. The solution operates as follows:
- Amazon RDS serves as the source database, where sample data about Airbnb hosts is inserted. We utilize a Postgres Serverless V2 engine for this purpose.
- AWS DMS extracts the CDC feed from RDS and inserts the raw data into an S3 Bucket.
- This upload event triggers a Lambda function containing the code to invoke an AWS Glue Job.
- The Glue Job is an Apache Spark application that reads the input data, cleans it, and applies the merge logic to a target table in the Silver S3 Bucket.
- The table in the Silver Bucket is an Apache Iceberg table that aligns with the data in the source database.
1. Setting up the Source Database
In this guide, we’ll utilize Aurora PostgreSQL Serverless V2 as our cost-effective source database, though the following steps can also be applied to any relational database compatible with AWS Database Migration Service (DMS), including on-premises databases.
To begin, we need to populate our database with some initial data for testing purposes. If you’re using Aurora PostgreSQL Serverless V2, the Query Editor in RDS is a convenient tool for this task.
AWS DMS is capable of supporting Change Data Capture (CDC) on Amazon RDS PostgreSQL databases, provided the database instance is configured for logical replication.
To enable this, create a Custom Parameter Group within RDS and assign it to your database. In this parameter group, set the rds.logical_replication parameter to 1.
This setting activates logical replication, which is a prerequisite for CDC with AWS DMS.
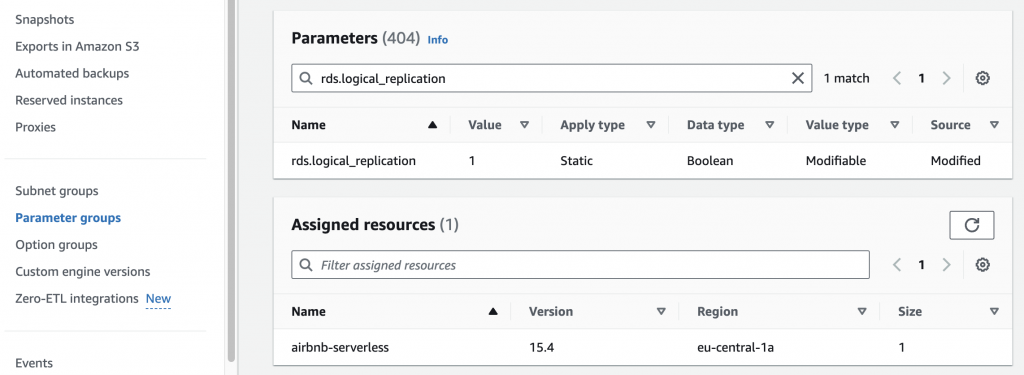
This static parameter requires a reboot of the DB instance to take effect. Check if additional parameters are necessary for your specific setup.
For other database engines, configuration steps may vary, so it’s crucial to consult the relevant documentation for your database type to ensure correct setup for CDC.
2. Setting up DMS
Next, we need to configure RDS to manage the replication process effectively. This involves creating several key resources:
1. Replication instance:
Create a replication instance that will handle the actual data transfer. Consider opting for a serverless replication setup if suitable for your needs. Ensure that this instance can connect to your specified endpoints.
2. Source Endpoint: Set this up to link with your Aurora database, establishing it as the data source.
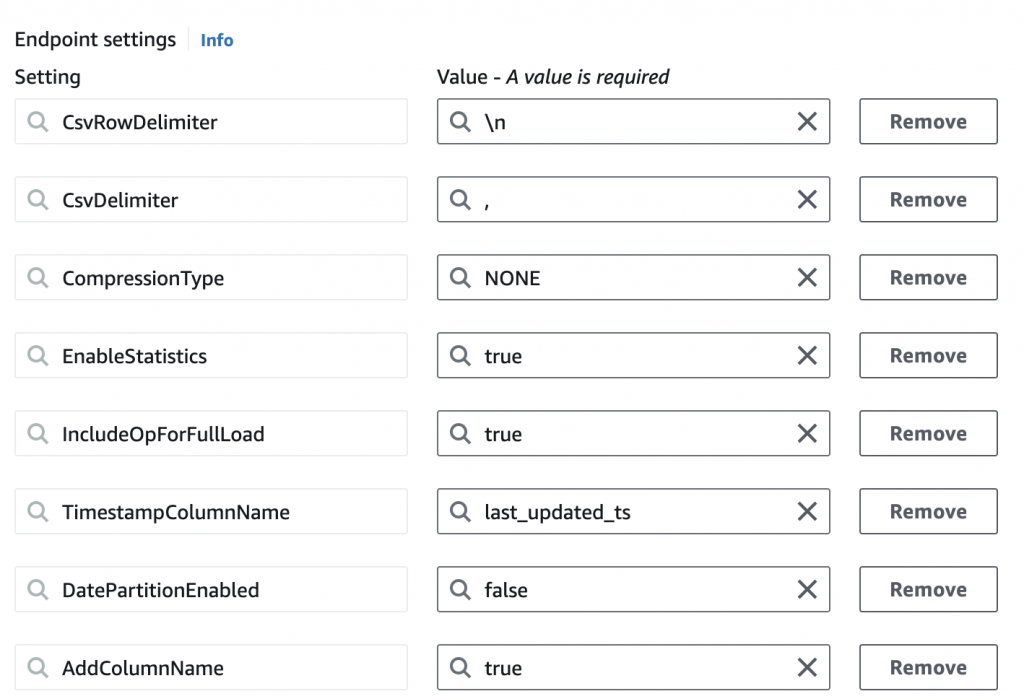
3. Target Endpoint:
Configure the target endpoint to direct to the ‘Bronze Bucket’ in your S3 Data Lake.
It’s crucial to apply additional configurations here to align with the CDC logic we plan to use:
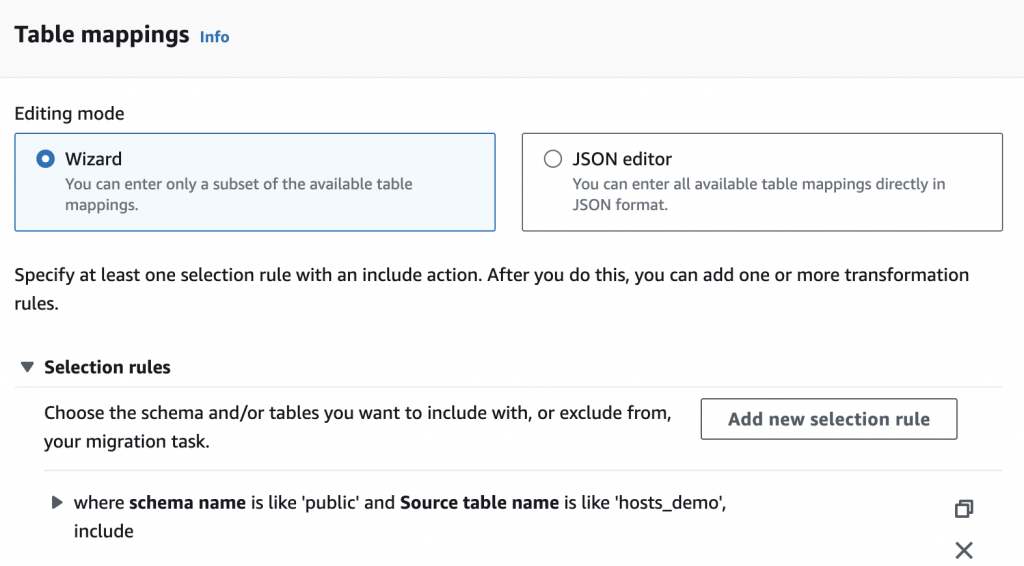
4. Database Migration Task:
Create a migration task with the setup “migrate existing data and replicate ongoing changes”. Here, you can also decide whether to replicate all tables or only specific ones:
3. Creating the Tables in the Lake
Before loading data into the lake, it’s crucial to create two tables in the AWS Glue Data Catalog: one for raw data and another for the cleaned and merged data.
For raw data stored as CSV, configure the bronze table as follows:
CREATE EXTERNAL TABLE hosts_bronze (
   op STRING,
   last_updated_ts STRING,
   id INT,
   url STRING,
   name STRING,
   since STRING,
   location STRING,
   response_time STRING,
   response_rate STRING
)
ROW FORMAT SERDE 'org.apache.hadoop.hive.serde2.OpenCSVSerde'
LOCATION 's3://merge-demo-bronze/dms/airbnb_db/public/hosts_demo'
TBLPROPERTIES ('skip.header.line.count' = '1')
For the cleaned and merged data, the silver table removes the operation column and modifies some data types and columns based on the cleaning steps.
Importantly, this table is defined as an Apache Iceberg table to utilize its advanced features:
CREATE TABLE hosts_silver (
   last_updated_ts TIMESTAMP,
   id INT,
   url STRING,
   name STRING,
   since DATE,
   location_city STRING,
   location_country STRING,
   response_time STRING,
   response_rate STRING
)
LOCATION 's3://merge-demo-silver/hosts/'
TBLPROPERTIES ('table_type'='ICEBERG', 'format'='parquet')
4. Configuring Lambda
The Lambda function is designed to automatically trigger when new data arrives in the bronze bucket.
To enable this, set up an Event Notification on the bronze bucket that activates the Lambda function:

This function is tasked with initiating the Glue job that processes data from the bronze to the silver table:
import boto3

def lambda_handler(event, context):
    glue_client = boto3.client('glue')
    glue_job_name = 'Bronze_to_Silver'

    try:
        # Start the Glue job
        response = glue_client.start_job_run(JobName=glue_job_name)
        print(f"Glue job started: {response['JobRunId']}")
    except Exception as e:
        print(f"Error starting Glue job: {str(e)}")
        raise e
5. AWS Glue – Cleaning & Merge Implementation
Now, let’s dive into the AWS Glue setup and the implementation of cleaning and merging processes using Apache Spark:
We utilize AWS Glue and Apache Spark for scalable data transformation. Initially, configure the Glue job with the following settings:
- Assign the correct IAM Role for accessing the data.
- Select the Worker Type and workers. For this example we use Worker type G 1X and 2 workers.
- Enable Job bookmarking to ensure only new files are processed.
- Define two crucial job parameters for working with Apache Iceberg tables:
- –datalake-formats iceberg
- –conf settings for integrating Spark with Iceberg, including catalog details and file IO configurations.
# First Parameter
--datalake-formats iceberg

# Second Parameter. Here Key is set to --conf and value to the rest of the provided code (including all configs)
--conf spark.sql.extensions=org.apache.iceberg.spark.extensions.IcebergSparkSessionExtensions
--conf  spark.sql.catalog.job_catalog.warehouse=s3://merge-demo-silver/hosts/
--conf spark.sql.catalog.job_catalog=org.apache.iceberg.spark.SparkCatalog
--conf spark.sql.catalog.job_catalog.catalog-impl=org.apache.iceberg.aws.glue.GlueCatalog
--conf spark.sql.catalog.job_catalog.io-impl=org.apache.iceberg.aws.s3.S3FileIO
--conf  spark.sql.catalog.glue_catalog.glue.lakeformation-enabled=true
--conf spark.sql.iceberg.handle-timestamp-without-timezone=true
These configurations are necessary to ensure our Spark application will work properly as we are working with an Apache Iceberg table. Alternatively, those parameters can be set within the script.
Now we can read the data from the bronze first by utilizing the Glue Data Catalog:
## --- Read Input Table ---
hostsIncrementalInputDF = glueContext.create_dynamic_frame.from_catalog(
    database = "airbnb",
    table_name = "hosts_bronze",
    transformation_ctx = "hostsIncrementalInputDF"
).toDF()
Next, we need to apply some logic to the CDC Feed we process, to ensure it is properly applied to the target table.
Our goal is to deduplicate the data to ensure only the most recent operation is applied to our target table, if the CDC feed holds multiple operations for one row.
Let’s say we have an update first and then a delete on the same record. In this case, there is no need to perform the update on the target first, if it will be deleted anyway. Additionally, this will make our lives easier with the actual merge as only one operation will be performed per changed or deleted row.
To implement this deduplication, we can use a Window function, partition by id and order by the last_updated_ts to have the most updated operation first. Then use row_number over this window to add a new column which defines the order of the executed operations per row and finally we take only the most recent operations and drop the helper row_num column:
## --- DEDUPLICATION ---
# Deduplication logic assuming 'id' as unique identifier and 'last_updated_ts' as timestamp
windowSpec = Window
    .partitionBy(hostsIncrementalInputDF.id) \
    .orderBy(col("last_updated_ts") \
    .desc())
# Adding row number based on 'last_updated_ts' within each 'id' group
rankedDF = hostsIncrementalInputDF \
    .withColumn("row_num", row_number().over(windowSpec))
# Keeping only the latest record for each 'id'
deduplicatedDF = rankedDF \
    .filter(col("row_num") == 1) \
    .drop("row_num")
Next, we apply some cleaning which is also part of the proper bronze to silver transformation step. Here we adjust data types, and split the location column into 2 columns:
## --- CLEANING ---
# Now, apply transformations to the deduplicated DataFrame
deduplicatedDF = deduplicatedDF \
    .withColumn("last_updated_ts", col("last_updated_ts").cast(TimestampType())) \
    .withColumn("since", col("since").cast(DateType())) \
    .withColumn("location_split", split(col("location"), ",\s*")) \
    .withColumn("location_city", col("location_split").getItem(0)) \
    .withColumn("location_country", col("location_split").getItem(1)) \
    .drop("location") \
    .drop("location_split")

# Register the deduplicated DataFrame as a temporary view
deduplicatedDF.createOrReplaceTempView("deduplicated_view")
Finally, the merge can be applied. For this, we use Spark SQL and the handy MERGE INTO statement.
The code should be very self-explanatory. We do the merge on the id column and if there is a match we either delete the target row if the operation on the source was a delete or we update it if the operation was an update.
If there is not a match, we insert the new row
## --- MERGE ---
merge_sql = """
    MERGE INTO job_catalog.airbnb.hosts_silver AS target
    USING deduplicated_view AS source
    ON target.id = source.id
    WHEN MATCHED AND source.op = 'U' THEN UPDATE SET
        target.last_updated_ts = source.last_updated_ts
        target.url = source.url,
        target.name = source.name,
        target.since = source.since,
        target.location_city = source.location_city
        target.location_country = source.location_country
        target.response_time = source.response_time
        target.response_rate = source.response_rate
    WHEN MATCHED AND source.op = 'D' THEN DELETE
    WHEN NOT MATCHED THEN INSERT (last_updated_ts, id, url, name, since, location, response_time, response_rate)
    VALUES (source.last_updated_ts, source.id, source.url, source.name, source.since, source.location, source.response_time, source.response_rate)
"""
spark.sql(merge_sql)
Remember that all of this works so smoothly only because we are using Apache Iceberg as the transactional layer above our target table, which allows these database-like behaviors.
Now our pipeline is set up end-to-end.
Should I always use CDC?
Using Change Data Capture (CDC) to synchronize large relational data sources with transactional tables in a data lake is a logical choice, though it introduces certain complexities, as this blog post explores.
Additionally, you must consider the risk of late-arriving CDC data, which can lead to unexpected behavior.
Thus, if you are not dealing with large volumes of data, do not require near real-time synchronization, and do not need to query historical data versions (time travel), you might consider regularly taking full snapshots of your database instead. This method can simplify operations under specific circumstances.
Alternatively, if you are still exploring the necessity of integrating your data into a data lake and prefer a more cautious approach, using Athena’s federated query feature might be suitable. This feature allows you to query data directly in Amazon RDS, providing the flexibility to transfer data to the data lake later, based on your evolving needs.
End-to-end guide on Youtube
I have uploaded a Youtube Video where I guide you through the whole solution and show a demo of the end result: